
Author: Etienne Oosthuysen
Microsoft’s announcement of the release of Azure Analysis Services for SSAS Tabular solutions as a PaaS solution has come at just the right time.
In the modern world of Advanced Analytics, Semantic Models rather than data warehouses will increasingly play the core role in corporate data landscapes – they are places where data is blended into models that business users can understand, they provide single sources of truth, they can increasingly embrace data from anywhere, they serve as centralised repositories for business rules, they are massively responsive to business change, etc.
In addition, as the business adoption of cloud platforms increase and as they move away from server-based/ Infrastructure as a Service (IaaS) solutions towards Platform as a Service (PaaS) solutions, the greater the need becomes for PaaS based Semantic Models.
But as with most new services and technologies, they can take a while to settle down, so we gave this a few months and now decided to give Azure Analysis Services a proper test drive. In this article, we share our experiences in setting up an Azure Analysis Services solution – we run through its set-up and automation, we provide hints worth sharing, and we discuss the advantages of adopting Azure Analysis Services over its Virtual Machine/ IaaS based siblings.
1 Benefits
Many organizations are moving away from on-premise server-based solutions, some are even trying to avoid IaaS based solutions to meet their Analytical Workloads. This is mostly due to the cost advantages and flexibility associated with PaaS over IaaS and the sheer convenience of support, maintenance, and availability.
But some services in the Microsoft Business Intelligence stack, notably SQL Server Reporting Services (SSRS) for paginated reports, SQL Server Integration Services (SSIS) for batch ETL workloads, Master Data Services (MDS) for Master and Master Reference Data management and until recently SQL Server Analysis Services (SSAS) for semantic model databases, could only be deployed as Virtual Machine/ IaaS or server-based solutions.
HINT: Please also note that some of the other IaaS based services are on a current and imminent PaaS roadmap, so we should hopefully see some more PaaS versions of previous IaaS only services. Please make sure you bear this in mind when planning your environments.
Azure Analysis Services is available in the Australian Regions (Australia East and Australia South East) so for me often having to deal with questions around data sovereignty, Azure Analysis Services, and its underlying storage as Storage Accounts, both being local, therefore presents no data sovereignty issues at all. By the way – most major regions worldwide are now supported.
It ties in nicely with dev ops processes. It is for example much more responsive to changing business needs such as responding to unforeseen usage trends, without the need to manage VM’s.
There are obvious cost benefits. The PaaS model for Azure Analysis Services means that the solution can be scaled up or down to meet varying workload requirements, and even paused when not used. This all means a much more flexible PAYG cost model.
There are no new dev technologies or skills required. The solutions are still created using Visual Studio (SSDT templates), it is still managed and monitored through SQL Server Management Studio (SSMS), and it is still deployed in a similar way as before. There are however some deployment gotchas and automation pitfalls, but these can be easily overcome. We discuss these later in this article.
Power BI will find it much simpler to connect to Azure Analysis Services as it need not worry about an Enterprise Gateway. This makes for an even simpler architecture.
Below are our test drive results for Azure Analysis Services. We assessed it through the following criteria:
· How easy is it to set up the service?
· What about the development experience?
· What does deployment look like?
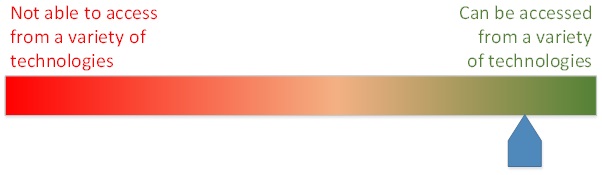
· How easy is it to actually access and use it?
· Are there any operationalize pitfalls? We step through how to overcome these.
Say “hello Azure Analysis Services!”
2 Set up
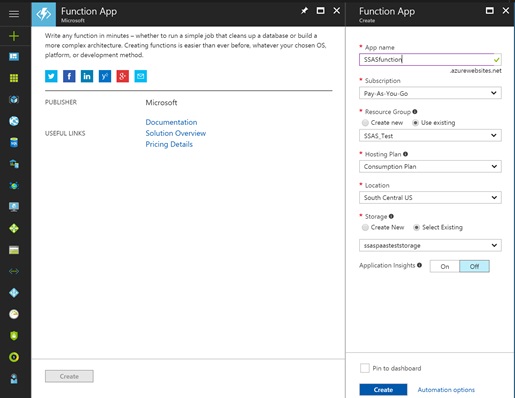
Set up was really easy – you select a name, resource group, location, administrator (a named user from your AAD tenancy), and a pricing tier.
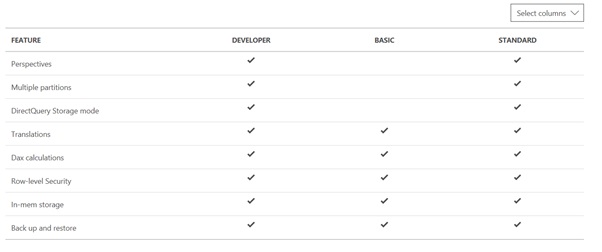
HINT: The pricing tier comes in Developer, Basic and Standard options. Our suggestion is to opt for the Developer tier for evaluation, dev and test purposes and then to advance to either basic or standard for production depending on whether Perspectives, Multiple Partitions, and Direct Query mode were used during the development cycle.
https://azure.microsoft.com/en-au/pricing/details/analysis-services/
The most basic Developer tier (D0) will equate to approx. $126 (AUD) per month if run 24 x 7, based on standard Microsoft pricing as at the date of this article.
Administrators can pause and resume the server as required. There are no charges whilst the server is paused. The developer cost quoted is, therefore, worst case scenario for this tier.
In addition, Azure Analysis Services use very cost effective Azure Storage Accounts as its primary storage mechanism.
HINT: We suggest to select the same location for the storage account as was selected for the Azure Analysis Services for performance reasons. We selected Australia South East.
3 Development
Azure Analysis Services uses the same development regime as SSAS Tabular, it’s only the deployment that is different. So, there should be no issues as long as you know your way around SSDT.

Developers can use SQL Server Data Tools in Visual Studio for creating models and deploying them to the service. Administrators can manage the models using SQL Server Management Studio and investigate issues using SQL Server Profiler.
HINT: Make sure you have the latest version of SSMS and SSDT otherwise you may run into trouble:
https://docs.microsoft.com/en-au/sql/ssms/download-sql-server-management-studio-ssms
https://docs.microsoft.com/en-au/sql/ssdt/download-sql-server-data-tools-ssdt
4 Deploy
Deployment can be tricky, but nothing too severe that cannot easily be overcome. Deployment is in theory very straightforward, but we suspect most people may run into compatibility level problems – we fall into that trap. We think it’s safe to say most people will still be using SQL Server 2012 or 2014. This requires some upgrades before you can deploy to Azure Analysis Services.
4.1 Ensure a consistent compatibility level
HINT: Deployment to Azure Analysis Services will only work at a compatibility level of 1200 or higher. Therefore (as in my case) upgrade the local version of SQL Server (or whatever is used as the workspace server) from 2014 to 2016.
HINT: Ensure Visual Studio also uses the correct compatibility level.
When we initially created the Visual Studio solution we would have selected a compatibility mode and quite likely “Do not show this message again”.
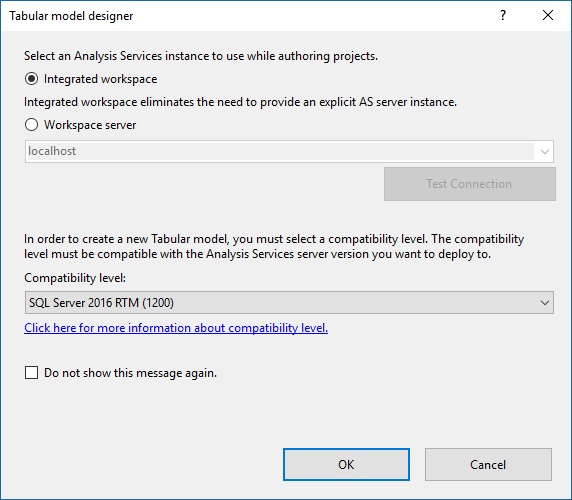
This means that all of our projects will have defaulted to the compatibility level we originally specified (1103). To change this, we had to log into the Tabular database in SSDT, then select Tools > Options. We then had to set the compatibility level as per below.
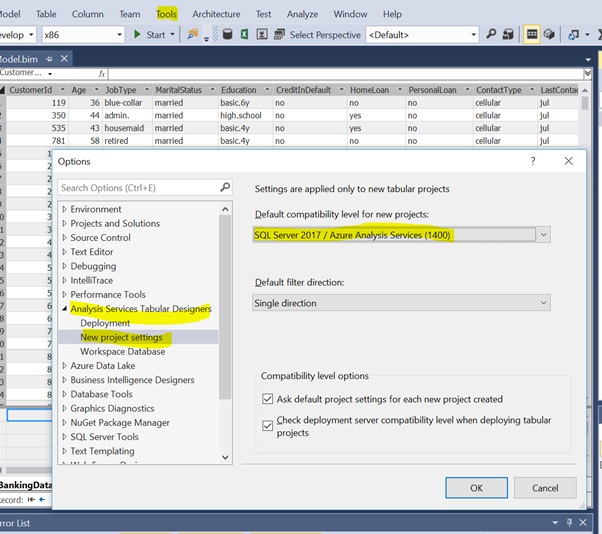
HINT: Keep in mind, upgrading the compatibility level is irreversible.
4.2 Actual deployment
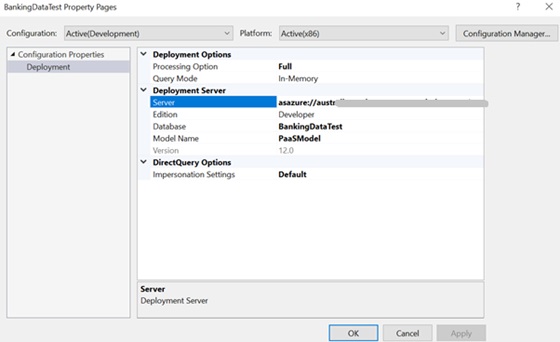
- Right-click the project
- Select properties
- Alter your Server, the database, and the model name
- Click apply
Back in your project
- Right-click the project
- Select Deploy
- Log in to your subscription
- The Deployment should now start and hopefully complete without errors
5 Using the Azure Analysis Services Model
You may want to connect to your new Azure Analysis Services cube via SQL Server Management Studio (SSMS) or via a reporting tool such as Power BI or Excel.
All of these mechanisms proved to be seamless and simple as long as you are familiar with accessing IaaS or on premise-based SSAS Tabular databases. The fact that no Enterprise Gateway complications exist also makes using PaaS for Azure Analysis Services a very compelling option.
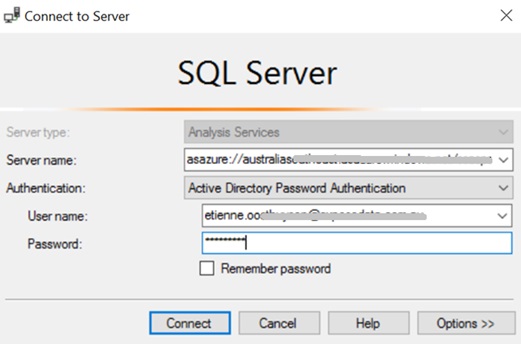
5.1 SSMS
We opted for Active Directory Password Authentication.
Browsing the Tabular database was exactly the same as the IaaS or on premise-based equivalent. We found performance to be pretty good too, even at the D0 tier.

5.2 Power BI
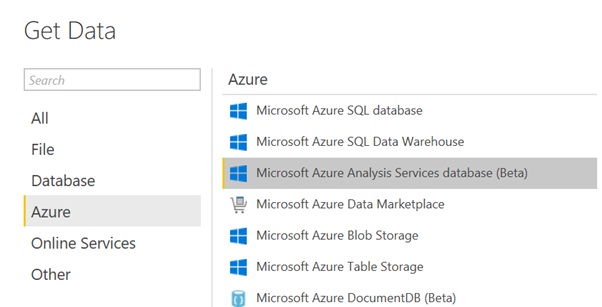
The connection to Azure Analysis Services is found under the Azure section of the Get Data functionality.
We opted for Live Connection, i.e. allow the data to remain in Azure Analysis Services rather than bring it into Power BI.
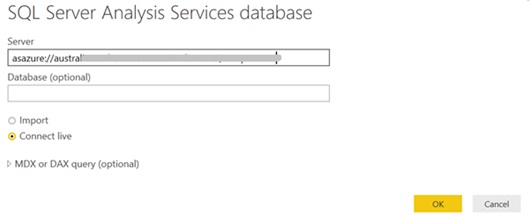
Simple log in using my Organisational account
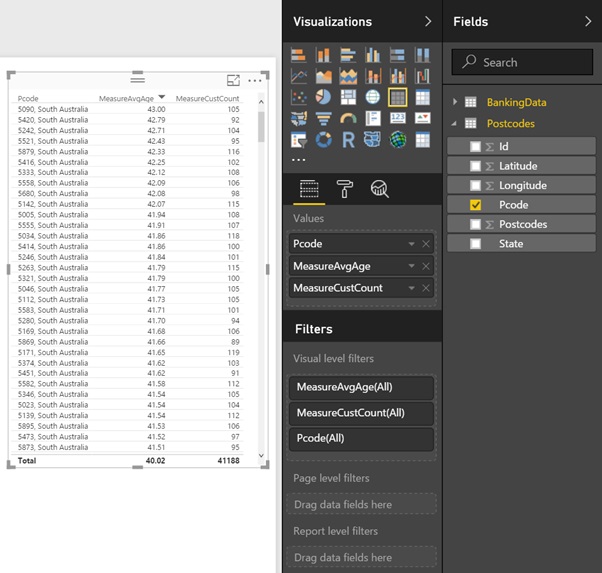
And we’re in!
5.3 Other
Other 3rd party BI tools can also connect to Azure Analysis Services. This article, for example, discusses connections from Tableau.
https://azure.microsoft.com/en-au/blog/connect-tableau-to-an-azure-analysis-services-server/
6 Operationalise, Processing and other management tasks
You can, of course, process your Tabular database through SSMS manually, but in this section, we are automating that process on a scheduled basis. This can still be achieved via ETL, but as we are highlighting a PaaS solution here, we are limiting this discussion to PaaS only (SSIS still at the date of authoring of this article still an IaaS service only).
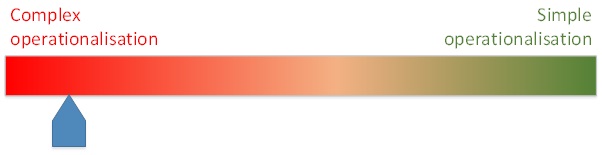
This automation has proved to be the most difficult of all criteria assessed. It is however relatively simple once it’s up and running, but it took quite a bit of effort to get to that point.
Our lower rating here is therefore not so much a judgement on Azure Analysis Services, but on Azure’s overall Automation regime, which is still very code-heavy and, in our opinion, not as nicely integrated and mature as other services’ integration, for example, the integration between Azure Event Hubs and Azure Stream Analytics.
In the sections below, we step you through how to automate the processing of Azure Analysis Services.
6.1 Azure Functions
In order to Automate Azure Analysis Services, it’s important to understand Azure Functions. Azure functions enable us to run small pieces of code, and it allows for this code to run without having to worry about an application or infrastructure to run the application. It also gives us the choice of various development languages (C#, F#, Node.js, Python, and PHP). In the following we list some of the key features of Azure functions:
HINT: Azure Functions come in two pricing plans as:
“Consumption plan – When your function runs, Azure provides all the necessary computational resources. You don’t have to worry about resource management, and you only pay for the time that your code runs.
App Service plan – Run your functions just like your web, mobile, and API apps. When you are already using App Service for your other applications, you can run your functions on the same plan at no additional cost.”
https://docs.microsoft.com/en-us/azure/azure-functions/functions-overview
6.2 Automating the scheduled processing of Azure Analysis Service using Azure Functions
In this section, we will walk you through how to use Azure Functions to trigger the processing the Azure Analysis Services database or tables.
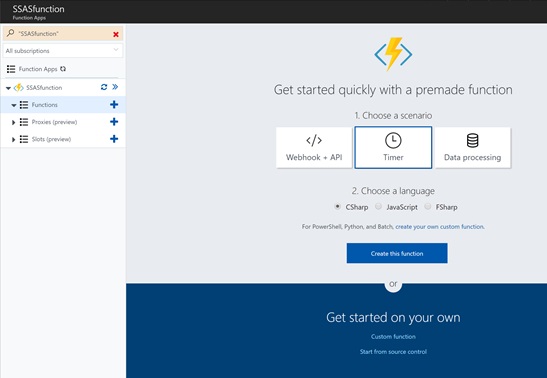
6.2.1 Create the Azure Function
After creating new function app, open the app and choose “Timer” with “CSharp” language to create a new function:
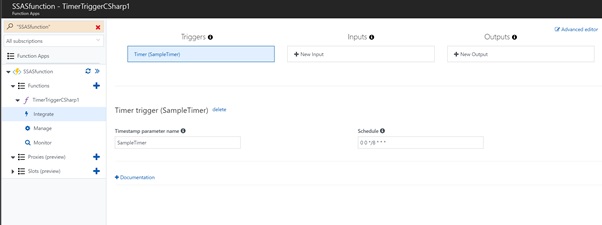
6.2.2 Set up the Timer
Click on Integrate and select the Timestamp parameter name and schedule. In this example, we set the schedule to trigger the function every 8 hours.
6.2.3 Function App Configuration Setting
To run the Azure analysis service, upload the following files to the existing function. These files can be found from your local computer.
HINT: Make sure you have the latest data providers installed on your computers.
To get more info and download the latest data (if not available on your local computer) please see https://docs.microsoft.com/en-us/azure/analysis-services/analysis-services-data-providers
C:\Windows\Microsoft.NET\assembly\GAC_MSIL\Microsoft.AnalysisServices.Core\ Microsoft.AnalysisServices.Core.DLL
C:\Windows\Microsoft.NET\assembly\GAC_MSIL\Microsoft.AnalysisServices.Tabular\Microsoft.AnalysisServices.Tabular.DLL
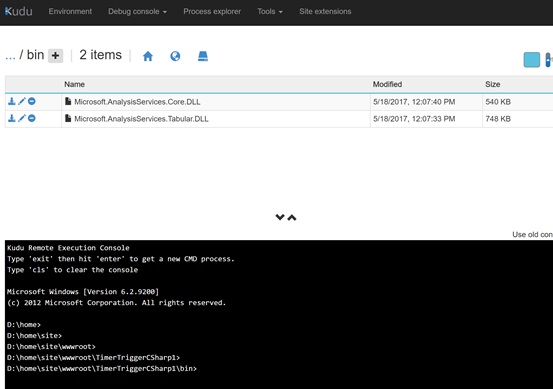
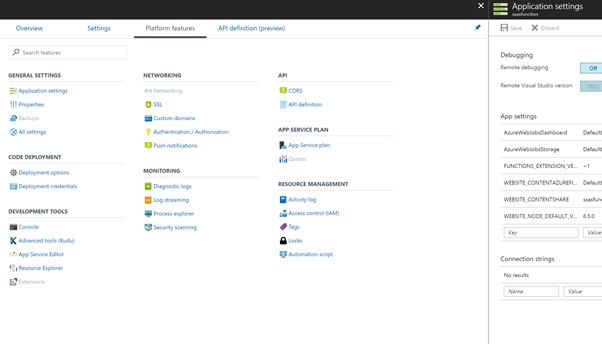
The triggering function needs to use the above files. To load them into the app, click on function app> Platform features> Advanced tools (Kudu)
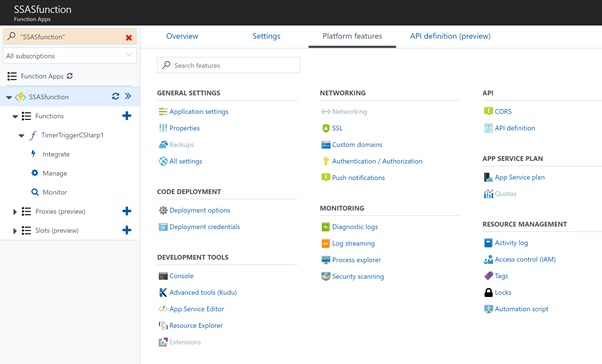
In a new window, select Debug Console>CMD. Navigate to “bin” folder and load the files into it.
6.2.4 Set up the Connection Strings
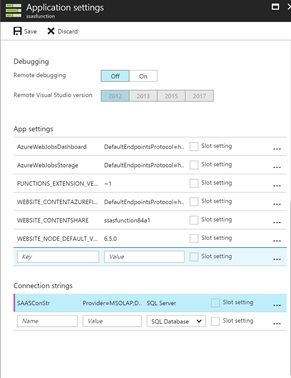
To set the connection string, select Platform features>Application settings:
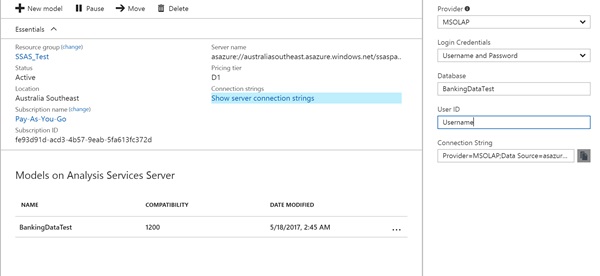
Fill the connection string values as “name”, “value” and “SQL server”. The “name” will be used in your C# code. The “value” can be selected from SSAS server overview page:
6.2.5 Add the code
HINT: Remember to change the Run function input, Connection string, database and table names based on your model.

Click Save and Run. You should see the following logs:
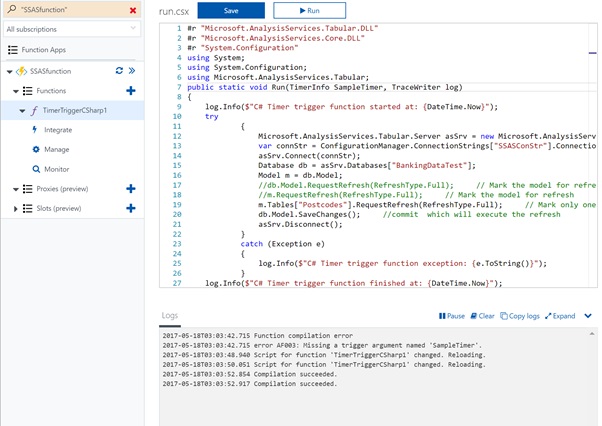
Voila!
Contributors: Etienne Oosthuysen, Shaun Poursoltan